Troubleshoot WiFi Connected But No Internet Access
Having trouble with your WiFi connection showing as connected but not being able to access the internet? Here are some troubleshooting tips to help you get back online.
Signs of Connectivity Issues Without Internet Access
If you’re experiencing connectivity issues without internet access, there are a few signs to look out for. Firstly, check if your device is connected to the WiFi network but still unable to access the internet. You may also notice that web pages won’t load or that you’re unable to send or receive emails. Additionally, you might see a message indicating a problem with the network connection.
First, try restarting your router and modem to see if that resolves the issue. If not, check for any firewall or antivirus software that may be blocking your internet access. You can also try clearing the cache on your web browser or using a different browser altogether. If you’re still experiencing issues, consider contacting your internet service provider to see if there is a problem with your connection.
Common Causes of Network Troubles
- Check WiFi Connection
- Ensure that the WiFi is properly connected and the signal strength is adequate
- Verify that the correct network credentials are entered
- Restart Modem and Router
- Turn off the modem and router and wait for at least 30 seconds before turning them back on
- Check for any loose or disconnected cables
- Reset Network Settings
- Open Control Panel and navigate to Network and Sharing Center
- Select Change adapter settings and right-click on the WiFi adapter
- Choose Disable and wait for a few seconds before enabling it again
- Update Network Drivers
- Open Device Manager by pressing Windows Key + X and selecting Device Manager
- Expand the Network adapters category and right-click on the WiFi adapter
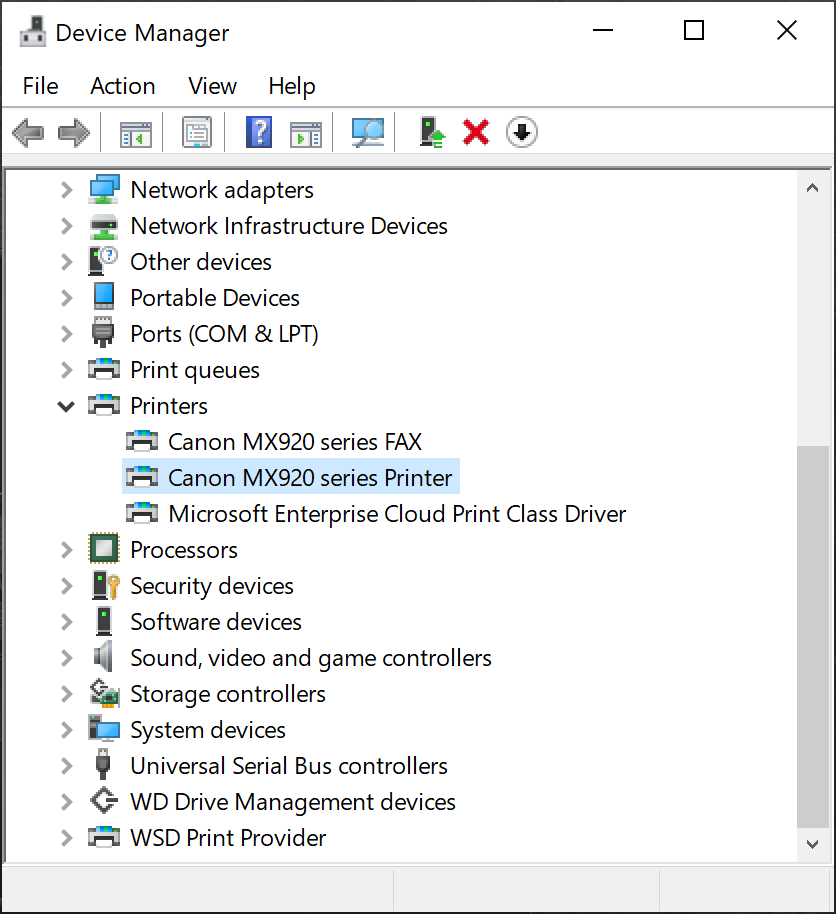
- Select Update driver and follow the on-screen instructions
Addressing IP Address Conflicts
If you are experiencing IP address conflicts when troubleshooting WiFi connected but no internet access, there are a few steps you can take to address the issue. First, check to ensure that your router is functioning properly and that there are no issues with the wireless network.
Next, release and renew your IP address to resolve any conflicts. You can do this by opening the command prompt and typing “ipconfig/release” followed by “ipconfig/renew”.
If the issue persists, you may need to reset your router to clear any lingering conflicts. This can usually be done by pressing the reset button on the router for a few seconds.
It’s also a good idea to check for any firewall or antivirus software that may be blocking your internet access and temporarily disable them to see if that resolves the issue.
Restart Router and Modem
If your WiFi is connected but you’re still unable to access the internet, restarting your router and modem can often resolve the issue. First, locate your router and modem and find the power cords. Unplug both the router and modem from the power source and wait for at least 30 seconds. After the 30 seconds, plug the modem back in and wait for all the lights to come on. Once the modem is fully powered up, plug the router back in and wait for it to fully restart.
After both devices have been restarted, try reconnecting to the WiFi and see if the issue has been resolved. If not, you may need to contact your internet service provider for further assistance.
Using Built-in Network Troubleshooters
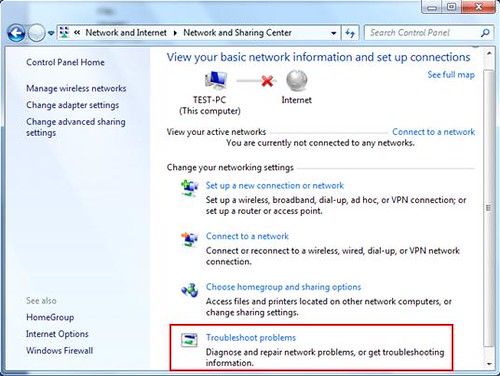
If you’re experiencing issues with WiFi connected but no internet access, you can use the built-in network troubleshooters to help diagnose and resolve the problem. In Windows 7, you can access the troubleshooters by clicking on the Start button and typing “troubleshoot” in the search box.
Once the troubleshooters window opens, select “Network and Internet” and then choose “Internet Connections.” This will prompt the system to run a diagnostic and attempt to fix any issues it finds.
If the troubleshooter is able to identify the problem, it will provide you with instructions on how to resolve it. These may include resetting the network adapter, releasing and renewing the IP address, or resetting the TCP/IP stack.
If the troubleshooter is unable to fix the issue, it may provide you with more detailed information about the problem, which can help you further troubleshoot or seek assistance from a professional.
Disabling Antivirus or Security Applications Temporarily
If you are experiencing WiFi connectivity issues despite being connected to the network, it may be due to your antivirus or security applications. Temporarily disable your antivirus or security software to see if it resolves the issue. Sometimes, these applications can block certain internet access and cause connectivity issues. Once disabled, check if you are able to access the internet. If the issue is resolved, you may need to adjust the settings of your antivirus or security software to allow internet access.
Keep in mind that disabling these applications temporarily can leave your computer vulnerable, so make sure to re-enable them once you have confirmed the cause of the issue.
Adjusting Your Router’s Wireless Mode
To adjust your router’s wireless mode, you will need to access your router’s settings. First, open your web browser and type in the IP address of your router in the address bar. This is usually something like 192. 168.
1. 1 or 192. 168. 0.
1. Once you’re in the router’s settings, look for the wireless mode or wireless settings tab. Here, you can change the wireless mode from ‘802. 11b/g/n’ to ‘802.
11b/g’ or ‘802. 11g’ depending on your router. After making the changes, save the settings and reboot your router. This should help resolve any issues with your WiFi connection.
However, if the issue is related to a problem with the internet connection itself, Fortect may not be able to fix it. It’s best to check with your internet service provider or a professional IT support team for assistance with internet access issues.

Resetting Network Equipment to Factory Settings
To reset your network equipment to factory settings, you can locate the reset button on your router or modem. This is typically a small hole that can be pressed with a paperclip or pen. Hold the reset button for 10-15 seconds until the lights on the device start flashing. This will erase any custom settings and return the device to its original state.
After resetting, you may need to reconfigure your network settings such as SSID and password. This can usually be done through a web browser by entering the router’s IP address.
Checking Your Internet Service Provider’s Status
To check your Internet Service Provider’s status, first, visit their website or call their customer service hotline. Look for any reported outages or maintenance in your area. If there are no reported issues, try restarting your router and modem. Unplug both devices, wait 30 seconds, then plug them back in. Check the indicator lights on your devices to ensure they are functioning properly.
If you’re still experiencing issues, contact your ISP for further assistance. It’s also a good idea to check if your account is up to date with payments to avoid any service disruptions. Keep in mind that sometimes network issues can be resolved with a simple reboot, so give that a try before contacting your ISP.
Updating Wireless Network Adapter Drivers
To update your wireless network adapter drivers, you can follow these steps. First, go to the Device Manager by right-clicking on the Start button and selecting Device Manager. Look for the Network adapters section and expand it. Then, right-click on your wireless network adapter and select Update driver.
Choose the option to search automatically for updated driver software. If Windows finds a new driver, it will install it. If not, you can visit the manufacturer’s website to download the latest driver and install it manually. After updating the driver, restart your computer to apply the changes.
This can help resolve connectivity issues and ensure your wireless network adapter is working optimally.
Resetting Network Settings on Devices
To reset network settings on your device, start by going to the settings menu on your device. Look for the option to reset network settings and select it. This will vary depending on the type of device you have, but it is usually found under the “Network” or “Connections” section. Once you have selected the option, follow the prompts to confirm the reset. After the reset is complete, restart your device to apply the changes.
This can often resolve issues with wifi connectivity and internet access. If the problem persists, you may need to contact your internet service provider or a tech support professional for further assistance.
Switching Wi-Fi Frequencies Between 2.4 GHz and 5 GHz
To troubleshoot WiFi connected but no internet access, you can try switching between 2.4 GHz and 5 GHz frequencies on your router. Log in to your router’s admin interface using a web browser and navigate to the wireless settings. Look for the option to switch between the 2.4 GHz and 5 GHz frequencies and make the change.
Sometimes, certain devices may have trouble connecting to one frequency over the other, so switching frequencies can help resolve connectivity issues. After making the switch, try reconnecting to the WiFi network on your devices and see if the internet access is restored.
If this doesn’t solve the issue, you may need to look into other troubleshooting steps such as resetting your router, checking for firmware updates, or contacting your internet service provider for assistance.
Testing Connectivity on Multiple Devices
To test connectivity on multiple devices, start by checking the connectivity of each device individually. Ensure that each device is connected to the correct wireless network and has a strong signal. Open a web browser on each device and attempt to access a website to see if there is internet connectivity. If one device has internet access while the others do not, the issue may be with the individual devices rather than the network.
Next, restart the router to refresh the network connection. Unplug the router from the power source, wait 30 seconds, then plug it back in. This can often resolve connectivity issues on multiple devices.
If restarting the router does not work, check the network settings on each device. Ensure that the devices are set to obtain an IP address automatically and that there are no conflicting network settings.
If the problem persists, consider resetting the router to its factory settings. This will erase any custom settings and configurations, so it should be a last resort.
By systematically testing the connectivity on each device and troubleshooting the network, you can identify and resolve the issue of WiFi connected but no internet access on multiple devices.
Optimizing Device and Router Placement
– When troubleshooting WiFi connectivity issues, it’s important to consider the placement of both your devices and your router.
– Ensure that your router is placed in a central location, away from obstructions and interference from other electronic devices.
– Position the router at an elevated level, such as on a shelf or mounted on the wall, to improve signal strength and coverage.
– Avoid placing the router near metal objects, mirrors, or concrete walls, as these can obstruct and weaken the WiFi signal.
– Additionally, ensure that your devices are within a reasonable distance from the router to maintain a strong and stable connection.
– Consider using WiFi extenders or mesh systems to improve coverage in larger homes or areas with dead zones.
– By optimizing the placement of your devices and router, you can improve the overall stability and performance of your WiFi network.
Scanning for Malware and Viruses
To troubleshoot WiFi connected but no internet access, it’s important to scan for malware and viruses on your device. Use a reliable antivirus software to perform a full system scan. Update the antivirus program and run a complete scan of your computer to detect and remove any potential threats.
Viruses and malware can disrupt your internet connection and cause connectivity issues. Make sure to regularly update your antivirus software to stay protected against the latest threats. If the scan detects any malware or viruses, follow the recommended actions to remove them from your system.
Additionally, consider installing a reputable anti-malware program to provide an extra layer of protection. Regularly scanning your device for malware and viruses can help prevent internet connectivity issues and ensure a smooth online experience.
By scanning for malware and viruses, you can eliminate potential threats that may be causing your WiFi to connect but have no internet access. This simple step can help resolve connectivity issues and keep your device and network secure.
Be aware that the wifi connection does not have internet access at the moment. Download this tool to run a scan