Fix Windows 10 Search Indexing Issues
Are you experiencing issues with Windows 10 search indexing? Let’s address the problem and find a solution.
Check for System Updates
Checking for system updates is essential to ensure that your Windows 10 operating system is running the latest version, which can help address any indexing issues. It may also resolve any underlying issues with the search functionality.
After installing the updates, it’s a good idea to restart your computer to ensure that the changes take effect. Once your system has restarted, you can check if the search indexing issues have been resolved.
By regularly checking for system updates, you can ensure that your Windows 10 operating system is optimized for performance and functionality, which can contribute to a smoother user experience.
Utilize the Search and Indexing Troubleshooter

To fix Windows 10 search indexing issues, utilize the Search and Indexing Troubleshooter. First, open the Search and Indexing Troubleshooter by pressing Windows key + R and typing msdt. exe -ep WindowsHelp id SearchDiagnostic. Then press Enter.
Follow the prompts to run the troubleshooter and allow it to identify and fix any issues with the Windows 10 search indexing. After the troubleshooter has completed its process, restart your computer and check if the search indexing issues have been resolved. If not, consider performing additional troubleshooting steps or seeking further assistance.
Restart or Reset Windows Search Service
To restart or reset the Windows Search Service, you can use Task Manager (Windows) or Windows PowerShell. In Task Manager, go to the “Services” tab, find “WSearch” and right-click to restart or reset. In PowerShell, type “Get-Service WSearch | Restart-Service” to restart the service or “Get-Service WSearch | Set-Service -StartupType ‘Automatic’ -PassThru | Start-Service” to reset and start it. This can help resolve Windows 10 Search Indexing Issues.
Additionally, Fortect can compare the current operating system with a healthy version and restore vital system files required for running and restarting Windows without affecting user data.

Rebuild the Search Index
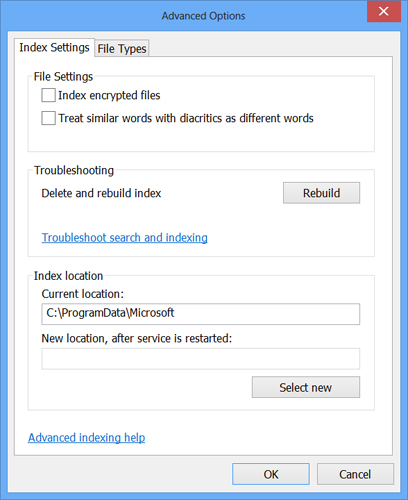
- Open the Control Panel by searching for it in the Windows search bar and selecting it from the results.
- Navigate to Indexing Options and click on it.
- In the Indexing Options window, click on Advanced.
- Under the Index Settings tab, click on Rebuild.
- Click OK to confirm the rebuild process.
Verify Windows Search Service Status and Permissions
To check the status of the Windows Search Service, open the Task Manager and go to the Services tab. Look for the “WSearch” service and ensure that it is running.
Next, verify the permissions for the Windows Search Service. Open the File Explorer and navigate to the “C:\ProgramData\Microsoft\Search” folder. Right-click on the folder, select Properties, and go to the Security tab. Make sure that the SYSTEM account has full control over the folder.
If the permissions are not set correctly, you can modify them by clicking on the Edit button and then adding the necessary permissions for the SYSTEM account.
After verifying the service status and permissions, you can restart the Windows Search Service to see if it resolves the indexing issues on your Windows 10 system.
Adjust Indexer Performance and Registry Values
To adjust the performance of the Windows 10 indexer and registry values, you can start by opening the Task Manager. Look for the Search process under the Processes tab and right-click on it. Select “Go to details” and then right-click on the Search process again. Set the priority to “High” to improve indexing speed.
Another way to adjust indexer performance is by modifying registry values. Press Windows key + R to open the Run dialog, type regedit, and press Enter. Navigate to HKEY_LOCAL_MACHINE\SOFTWARE\Microsoft\Windows Search and create a new DWORD (32-bit) value named “DisableIndexedContent” with a value of 1 to disable content indexing, or 0 to enable it.
By making these adjustments, you can improve the performance of the Windows 10 search indexing and resolve any related issues you may be experiencing.
Manage Backup and Restoration Processes
| Process | Description |
|---|---|
| 1. Backup Registry | Export and backup the Windows registry before making any changes to the search indexing settings. |
| 2. Create System Restore Point | Set a restore point in Windows 10 to revert back to in case any changes to the search indexing cause issues. |
| 3. Backup Indexing Settings | Export and backup the current search indexing settings to easily restore them if needed. |
| 4. Restore Previous Indexing Settings | If changes to the search indexing settings cause issues, revert back to the previous settings that were backed up. |
Be cautious as indexing may not work properly on Windows 10, causing search and file organization issues. Download this tool to run a scan