Overclocking Failed Error Troubleshooting and Fixing CPU Issues
Experiencing issues with overclocking your CPU and encountering the “Overclocking Failed” error? Let’s troubleshoot and fix these CPU issues together.
Resetting BIOS and UEFI Settings
To reset the BIOS or UEFI settings, you can try accessing the BIOS/UEFI menu during the boot process. First, restart your computer and press the designated key (usually Del, F2, F10, or F12) to enter the BIOS/UEFI setup. Once in the menu, look for an option to reset to default settings or load optimized defaults. Use the arrow keys to navigate and select the appropriate option, then confirm and save the changes before exiting the BIOS/UEFI.
If you are unable to access the BIOS/UEFI menu using the designated key, you can also try using the Clear CMOS button on your motherboard. Locate the Clear CMOS button on the motherboard (it is often near the battery or the rear I/O panel) and use a small object, such as a screwdriver, to press and hold the button for a few seconds. This will reset the BIOS/UEFI settings to their default values.
Another method to reset the BIOS/UEFI settings is by removing the CMOS battery. Turn off your computer and disconnect the power supply, then locate the CMOS battery on the motherboard. Carefully remove the battery, wait for a few minutes, and then reinsert it. This will reset the BIOS/UEFI settings to their default configuration.
After resetting the BIOS/UEFI settings, you may need to reconfigure any custom settings, such as boot order or overclocking parameters. Make sure to save any changes before exiting the BIOS/UEFI setup.
By resetting the BIOS/UEFI settings, you can troubleshoot and fix issues related to overclocking failures and CPU errors.
However, it does not specifically claim to fix overclocking errors.
Clearing the CMOS Battery
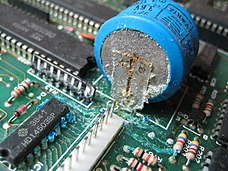
To clear the CMOS battery, follow these steps:
1. First, shut down the computer completely and disconnect the power supply.
2. Open the computer case to locate the CMOS battery on the motherboard. It is a small, round, silver battery.
3. Carefully remove the CMOS battery from its slot on the motherboard.
4. Wait for at least 5-10 minutes to allow the residual charge in the CMOS to dissipate.
5. After waiting, reinsert the CMOS battery back into its slot on the motherboard.
6. Close the computer case and reconnect the power supply.
7. Power on the computer and access the BIOS settings by pressing the Del key or the F2 key (depending on your motherboard) as the system boots up.
8. Once in the BIOS settings, use the arrow keys to navigate to the “Load Optimized Defaults” option. Press the Enter key to select this option.
9. Save the changes and exit the BIOS settings. The computer will restart.
10. Check to see if the “Overclocking Failed” error message has been resolved.
By clearing the CMOS battery, you are resetting the BIOS settings to their default values. This can often resolve issues related to overclocking and CPU performance. If the issue persists, you may need to further troubleshoot your hardware or seek professional assistance.
Updating the BIOS Version
| Step | Description |
|---|---|
| 1 | Check current BIOS version |
| 2 | Visit motherboard manufacturer’s website |
| 3 | Download latest BIOS update |
| 4 | Follow manufacturer’s instructions for BIOS update |
| 5 | Restart computer and check BIOS version |
Using Standard and Visual BIOS OC Profiles
- Check BIOS settings for overclocking
- Restart the computer and access the BIOS by pressing the designated key (usually Del or F2) during startup
- Navigate to the overclocking section and check if any overclocking profiles are enabled
- If using a Visual BIOS, check for any preset overclocking profiles that may be causing the error
Overclocking your computer may result in system instability and potential damage to your hardware. Download this tool to run a scan
