Troubleshoot Laptop WiFi Connection Issues
Are you tired of being left disconnected and frustrated with your laptop’s WiFi? Fear not, as we delve into troubleshooting laptop WiFi connection issues, equipping you with the knowledge and solutions to restore your connection and regain your peace of mind.
Troubleshooting network problems in Windows
1. Check the WiFi icon in the taskbar: Ensure it says “Connected” or “Connected, no internet access.” If not, continue troubleshooting.
2. Restart your laptop: This simple step can fix many network problems. Press the Windows key, select the power icon, and choose “Restart.”
3. Use the Network troubleshooter: Right-click the WiFi icon and select “Troubleshoot problems.” Follow the on-screen instructions to identify and resolve any issues.
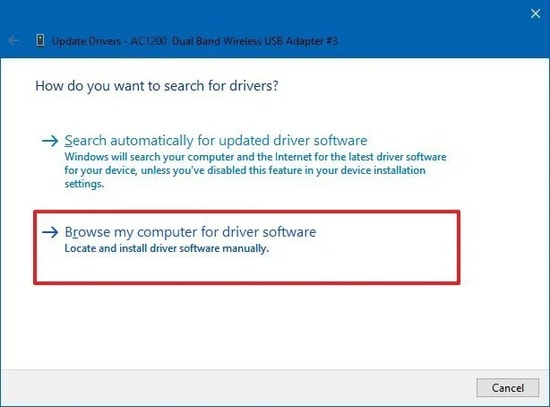
4. Update network drivers: Press Windows key + X, then select “Device Manager.” Expand the “Network adapters” section, right-click your WiFi adapter, and choose “Update driver.”
5. Reset network settings: Press Windows key + I to open Settings, select “Network & internet,” then “Network reset.” Click “Reset now” to restore network settings to their default state.
Things to try first
- Open the Control Panel by pressing the Windows key and typing “Control Panel” in the search bar.
- Click on Network and Internet and then select Network and Sharing Center.
- Click on Change adapter settings on the left side of the window.
- Right-click on the Wi-Fi adapter and select Disable.
- Wait for a few seconds, right-click on the adapter again, and select Enable.
Restart the Router
- Locate your Wi-Fi router and find the power cable connected to it.
- Unplug the power cable from the router and wait for about 30 seconds.
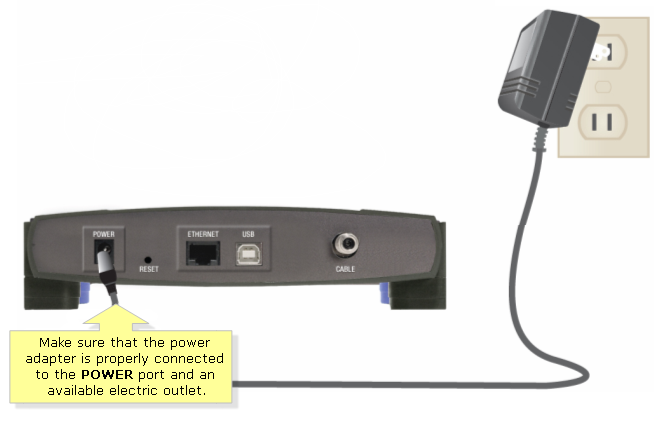
- Plug the power cable back into the router and wait for it to fully reboot.
Forget and Reconnect to the Wi-Fi Network
- Click on the Wi-Fi icon in the system tray (bottom-right corner of the screen).
- Find your Wi-Fi network in the list of available networks.
- Right-click on your network and select Forget.
- Click on the Wi-Fi icon again, find your network, and select Connect.
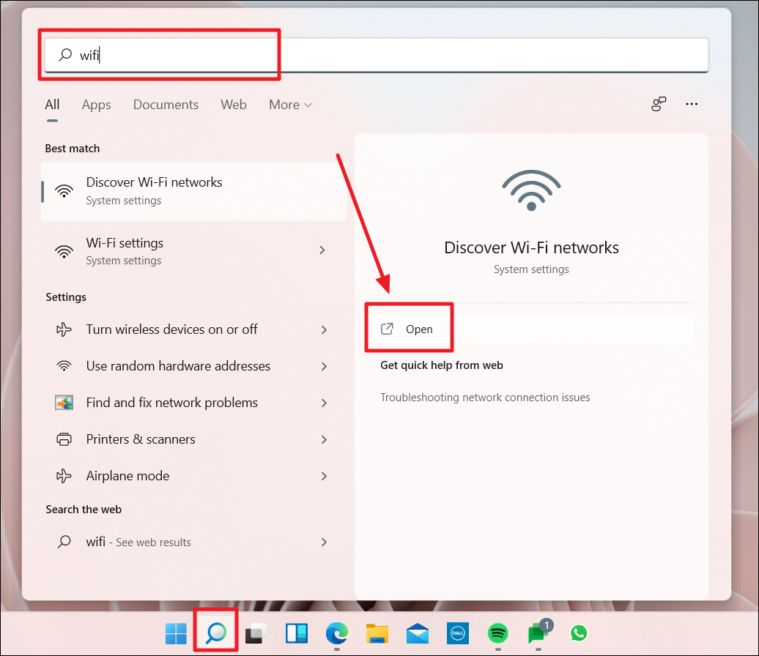
- Enter the Wi-Fi password if prompted and click Connect.
Update Wi-Fi Driver
- Press the Windows key and type “Device Manager” in the search bar.
- Click on Device Manager in the search results.
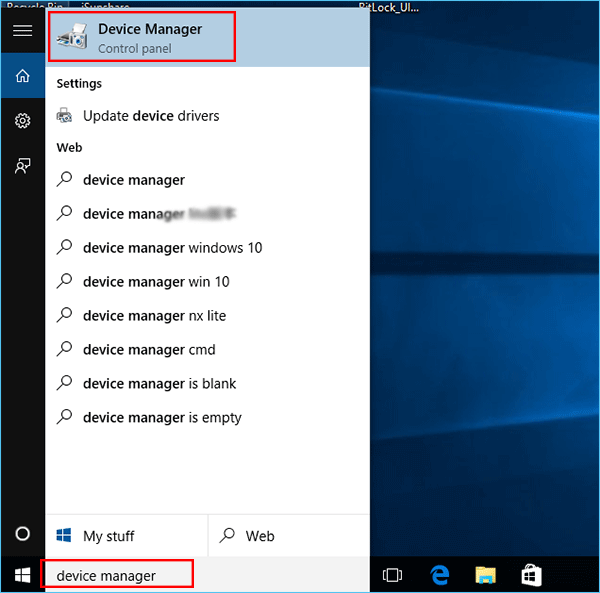
- Expand the Network adapters category.
- Right-click on the Wi-Fi adapter and select Update driver.
- Choose Search automatically for updated driver software.
- Wait for Windows to search and install any available updates for the Wi-Fi driver.
Check your Laptop’s Physical Wi-Fi Switch
If you’re experiencing Wi-Fi connection issues on your laptop, it’s important to check the physical Wi-Fi switch on your device. This switch is usually located on the side or front of your laptop, near the keyboard or networking ports.
First, make sure the switch is in the “on” position. If it’s off, flip it to the “on” position.
Next, check if the Wi-Fi button or indicator light is illuminated. If it’s not, press the Wi-Fi button or use the keyboard shortcut (refer to your laptop’s user manual for the specific shortcut) to enable Wi-Fi.
If the physical switch and Wi-Fi button are on, but you’re still having trouble connecting to Wi-Fi networks, try using the network troubleshooter in your operating system. On Windows 11, go to Settings > Network & Internet > Wi-Fi, and click on “Network troubleshooter.” Follow the on-screen instructions to diagnose and fix any connection problems.
By checking and adjusting your laptop’s physical Wi-Fi switch, you can ensure a smooth and reliable Wi-Fi connection on your device.
python

import subprocess
def check_wifi_status():
try:
output = subprocess.check_output(['netsh', 'wlan', 'show', 'interfaces'])
output = output.decode('utf-8')
if 'State : connected' in output:
print("Wi-Fi is connected.")
else:
print("Wi-Fi is not connected.")
except subprocess.CalledProcessError:
print("An error occurred while checking Wi-Fi status.")
check_wifi_status()
Note: This code only checks the status of the Wi-Fi adapter and does not attempt to fix any connection issues. It relies on the `netsh` command in Windows to retrieve the Wi-Fi interface information.
Turn Off Airplane Mode
To turn off Airplane Mode on your laptop and troubleshoot WiFi connection issues, follow these steps:
1. Open the Settings menu on your Windows 11 PC or laptop.
2. Look for the Wi-Fi tile and click on it to access the network settings.
3. Make sure the Airplane Mode toggle is switched off. If it’s already off, skip to the next step.
4. If Airplane Mode is on, toggle it off to enable Wi-Fi connectivity.
5. Check if your laptop is connected to the correct Wi-Fi network. Click on the network name and select the desired network from the list.
6. If your laptop still doesn’t connect, try changing the network frequency band. Open the network settings, click on the network name, and select a different frequency band.
7. If you’re using a MacBook, go to the Apple menu and choose System Preferences. Click on Network and ensure that Wi-Fi is enabled.
8. Lastly, if the issue persists, restart your laptop and modem to refresh the connections.
Restart Windows Explorer
Restarting Windows Explorer can help resolve various Wi-Fi connection issues on your laptop. It is a simple and effective troubleshooting method that can refresh the network settings and fix any temporary glitches.
To restart Windows Explorer, follow these steps:
1. Press Ctrl + Shift + Esc to open the Task Manager.
2. In the Task Manager, go to the Processes tab.
3. Scroll down and find Windows Explorer.
4. Right-click on Windows Explorer and select Restart.
This will temporarily close and restart Windows Explorer, which should resolve any issues with your laptop’s Wi-Fi connection.
Forgot Saved Wireless Network
If you forgot a saved wireless network:
1. Open the Wi-Fi settings on your laptop by clicking on the Wi-Fi icon in the system tray.
2. Look for the network you want to forget in the list of available networks.
3. Right-click on the network and select “Forget” or “Remove from list.”
4. This will remove the saved network from your laptop, but it will not affect your ability to connect to the network in the future.
5. If the network is still not showing up, try restarting your laptop and checking again.
6. If the network still does not appear, it may be a problem with the network itself or your laptop’s Wi-Fi hardware.
7. Consider contacting your internet service provider or the manufacturer of your laptop for further assistance.
8.
Run Network Troubleshooter
If you’re experiencing laptop WiFi connection issues, the Network Troubleshooter can help diagnose and resolve common problems. To run the troubleshooter, follow these steps:
1. Right-click on the Wi-Fi icon in the taskbar and select “Troubleshoot problems.”
2. The troubleshooter will automatically scan your network and identify any issues.
3. If any problems are found, the troubleshooter will provide suggested solutions. Follow the on-screen instructions to implement these fixes.
4. If the troubleshooter is unable to resolve the issue, try rebooting your laptop and modem.
By running the Network Troubleshooter, you can quickly troubleshoot and fix common WiFi connection problems, ensuring uninterrupted internet access. Whether you’re using a PC, Macbook, Lenovo laptop, Acer laptop, or HP Pavilion, this tool is designed to ease the process of resolving network issues. Stay connected to the world without any hassle.
Connect to Different Network Frequency Band
If you’re experiencing connection issues with your laptop’s Wi-Fi, it may be due to network frequency bands. To troubleshoot this problem, follow these steps:
1. Open your laptop’s settings by clicking on the “Start” menu and selecting the gear icon for “Settings”.
2. In the settings menu, click on “Network & Internet” and then select “Wi-Fi” from the left-hand side menu.
3. Under the “Wi-Fi” settings, click on the name of your network and then click on the “Properties” button.
4. Scroll down to the “Network band” section and click on the dropdown menu.
5. Select a different frequency band from the options provided. This will help you connect to a different network frequency band.
6. Once you’ve selected a different band, click on the “Save” button and close the settings menu.
7. Reboot your laptop to apply the changes.
It can also identify any hardware malfunctions that might be contributing to the issue. While it cannot specifically fix WiFi connection problems, it can address underlying issues that may be affecting your laptop’s overall performance.

Restart Your Router and Modem
Restarting your router and modem can often resolve common Wi-Fi connection issues on your laptop.
Here’s how to do it:
1. First, locate your router and modem. They are usually small devices with lights on them.
2. Find the power cable for both the router and modem.
3. Unplug the power cable from the back of the modem and router.
4. Wait for about 10 seconds. This allows the devices to fully power down.
5. Plug the power cable back into the modem first, and then into the router.
6. Wait for the devices to power back on. It may take a few minutes.
7. Once the lights on both devices are stable, try reconnecting your laptop to the Wi-Fi network.
This simple restart can often fix connection problems and ensure a smooth browsing experience.
Reduce Wireless Signal Interference
1. Check your Wi-Fi network frequency bands. Many devices, including PC laptops and smartphones, can connect to both 2.4 GHz and 5 GHz networks. If you’re experiencing connection problems, try switching to a less crowded frequency band.
2. Adjust your Wi-Fi settings. On Windows 10, click on the Wi-Fi tile in the system tray and select “Network & Internet Settings.” Under Wi-Fi, click on “Manage Known Networks” and remove any networks you no longer use. This can help prevent your laptop from automatically connecting to weak or interfering networks.
3. Avoid physical obstructions. Keep your laptop away from walls, large metal objects, and other electronics that can interfere with the Wi-Fi signal. Elevating your laptop can also improve signal strength.
4. Reduce interference from other devices. If you have a lot of wireless devices in your home, such as smartphones, tablets, and smart home devices, they can all compete for the same Wi-Fi signal. Try turning off or moving devices that are not in use to reduce interference.
5. Update your Wi-Fi driver. Outdated or incompatible drivers can cause connection issues. Visit your laptop manufacturer’s website or use Windows Update to ensure you have the latest driver for your Wi-Fi adapter.
Reinstall or Update Network Adapter
To reinstall or update your network adapter, follow these steps:
1. Press the Windows key + X and select Device Manager.
2. Expand the Network adapters category.
3. Right-click on your network adapter and select Uninstall device.
4. Check the box that says Delete the driver software for this device and click Uninstall.
5. Restart your laptop.
6. Press the Windows key + I to open Settings.
7. Go to Network & Internet and select Wi-Fi.
8. Click on Change adapter options.
9. Right-click on your network adapter and select Update driver.
10. Choose Search automatically for updated driver software.
11. Wait for the driver to install and then restart your laptop again.
If your Wi-Fi connection problem persists, try these additional methods:
1. Reset your network settings by going to Settings > Network & Internet > Status > Network reset.
2. Disable and enable your network adapter by right-clicking on it and selecting Disable, then right-clicking again and selecting Enable.
3. Update your laptop’s operating system and drivers by going to Settings > Update & Security > Windows Update.
4. Contact your laptop manufacturer’s support for further assistance.
Restore Advanced Internet Settings
To restore advanced internet settings on your laptop and troubleshoot Wi-Fi connection issues, follow these steps:
1. Open the Settings app on your laptop by pressing the Windows key + I or selecting the Start button and clicking on the gear icon.
2. In the Settings window, click on “Network & Internet.”
3. Select “Wi-Fi” from the left-hand menu and click on “Manage known networks.”
4. Choose the network you’re having trouble with and click on “Forget.”
5. Next, click on “Wi-Fi” again from the left-hand menu and scroll down to the “Advanced network settings” section.
6. Click on “Network reset” to restore all network settings to their defaults.
7. Restart your laptop and reconnect to the Wi-Fi network.
If you’re still experiencing connection problems, try updating your network adapter drivers or contacting your internet service provider for further assistance.
Check Network Services Are Running
1. Restart your laptop and router. Sometimes a simple restart can fix connection issues.
2. Ensure Wi-Fi is enabled on your laptop. Look for the Wi-Fi icon in the system tray and make sure it’s turned on.
3. Verify that your laptop is connected to the correct network. Open the Wi-Fi settings and select the network you want to connect to.
4. Check if other devices can connect to the Wi-Fi network. If other devices can connect without any issues, the problem may be with your laptop.
5. Reset the network settings on your laptop. Go to the network settings and click on “Network reset” to reset all network adapters to their default settings.
6. Update your network drivers. Visit the manufacturer’s website and download the latest drivers for your network adapter.
7. Try connecting to a different Wi-Fi network. If you can connect to other networks but not the one you’re having trouble with, the issue may be with the specific network.
Renew Your IP Address
If you’re experiencing Wi-Fi connection issues on your PC laptop, renewing your IP address may help resolve the problem. Here are the steps to follow:
1. Click on the Wi-Fi icon in the taskbar, usually located in the bottom right corner of the screen.
2. From the list of available Wi-Fi networks, select the network you’re having trouble with.
3. Click on the “Network & Internet settings” option.
4. In the Settings window, click on “Wi-Fi” in the left-hand menu.
5. Scroll down and click on “Change adapter options.”
6. Right-click on the Wi-Fi network you’re connected to and select “Properties.”
7. In the properties window, scroll down and select “Internet Protocol Version 4 (TCP/IPv4).”
8. Click on the “Properties” button.
9. In the next window, select the option to obtain an IP address automatically.
10. Click “OK” to save the changes.
Renewing your IP address can help resolve connectivity issues, allowing you to get back online with ease.
Perform Network Reset
Performing a network reset can help troubleshoot laptop WiFi connection issues. To do this, follow these steps:
1. Open the Start menu and click on the Settings icon.
2. In the Settings menu, select Network & Internet.
3. Under the Status tab, click on Network Reset.
4. A warning message will appear, informing you that this will remove and reinstall all network adapters and set other networking components back to their original settings. Click on Reset Now to proceed.
5. Your laptop will restart, and the network reset process will begin.
6. Once the reset is complete, reconnect to your WiFi network by clicking on the network icon in the taskbar and selecting your network from the list.
7. Enter your network password if prompted.
8. Your laptop should now be connected to the WiFi network.
Performing a network reset can help resolve various connection problems, such as when your laptop says it’s connected to the network but there’s no internet access.
Enable DHCP and Auto DNS
To troubleshoot laptop Wi-Fi connection issues, it’s important to make sure DHCP and Auto DNS settings are enabled. Here’s how:
1. On your Windows 10 PC, Lenovo laptop, MacBook Pro, MacBook Air, Acer laptop, or HP Pavilion, click on the Wi-Fi icon in the taskbar or system tray.
2. From the list of available networks, select the network you’re having trouble with.
3. If the network is not showing up, make sure Wi-Fi is turned on. On Windows 10, click on the Wi-Fi option in the taskbar and toggle it on. On Mac, go to System Preferences > Network > Wi-Fi and ensure it’s enabled.
4. Once connected to the network, right-click on the network name and select “Properties” or “Open Network and Sharing Center.”
5. In the network properties or network and sharing center, locate the “Internet Protocol Version 4 (TCP/IPv4)” option and double-click on it.
6. In the TCP/IPv4 properties window, make sure “Obtain an IP address automatically” and “Obtain DNS server address automatically” are selected.
7. Click “OK” to save the changes and close the window.
By enabling DHCP and Auto DNS, you allow your laptop to automatically obtain network settings, which can help resolve connection problems.
Is this article up to date?
If you’re wondering whether this article is up to date, rest assured that we’ve got you covered. Our troubleshooting guide for laptop WiFi connection issues is regularly updated to provide you with the most relevant and accurate information.
To ensure you’re getting the latest troubleshooting steps, check the date of the article, which you can find at the top or bottom of the page. If it’s recent, you can trust that the information is up to date.
If you’ve tried everything and still can’t connect to a WiFi network, there are a few things you can do. First, make sure your WiFi is turned on by clicking on the WiFi icon in the taskbar or system tray. If it says “Connected,” but you still can’t access the internet, try resetting your WiFi settings by going to the network settings on your laptop.
In some cases, rebooting your laptop and router can also help resolve the issue. If you’re using a PC laptop, make sure you’re within range of the WiFi network and that the network you’re trying to connect to is not hidden. For Mac users, check that the WiFi option is enabled in the network settings of your MacBook Pro, MacBook Air, or iPad.
Beware of potential connectivity issues as your laptop might not allow you to connect to wifi. Download this tool to run a scan