Fix Non-System Disk Error Windows 10 – 10 Solutions to Recover Data
Welcome to this informative article on fixing the non-system disk error in Windows 10! Here, we will explore ten effective solutions to recover your valuable data. Whether you’re facing this frustrating error or simply seeking preventive measures, this article has you covered. So, let’s dive in and ensure your data remains safe and accessible.
Understanding the Non-System Disk or Disk Error
1. Make sure the system disk is set as the primary boot device in BIOS/UEFI settings.
2. Check the SATA/IDE cable connections to ensure they are secure.
3. Use a reliable tool like MiniTool Partition Wizard to fix partition issues.
4. Replace the CMOS battery if it’s low or dead.
5. Boot from a Windows 10 installation CD and repair the OS.
6. Disconnect any external storage devices or floppy disk drives.
7. Remove any USB flash drives or CDs from the computer.
8. Use the Command Prompt to fix boot files or repair the disk.
9. If you have an HP laptop, run the HP PC Hardware Diagnostics.
10. In extreme cases, replace the hard disk drive and reinstall Windows.
General Troubleshooting Steps for Non-System Disk or Disk Error
- Check the boot order in BIOS
- Restart your computer and enter BIOS setup
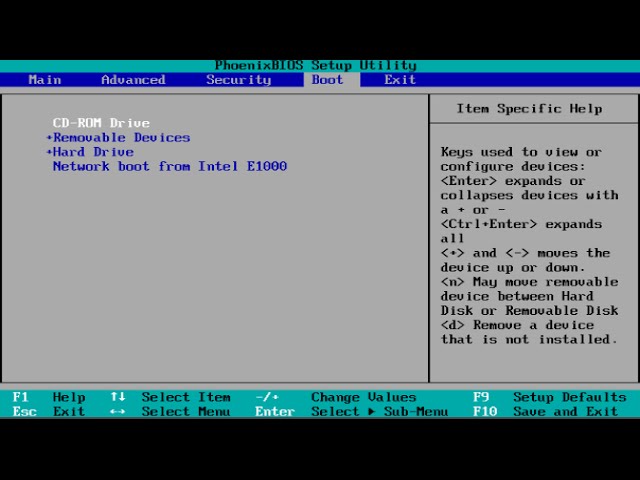
- Navigate to the Boot tab
- Ensure that the hard drive or SSD containing the operating system is listed as the first boot device
- Save the changes and exit BIOS
- Check the connections and cables
- Shut down your computer and unplug all cables connected to the computer
- Open the case and ensure that all cables are securely connected to the hard drive or SSD
- Check for any damaged or loose cables and replace if necessary
- Close the case and reconnect all cables

- Run disk diagnostics
- Restart your computer and enter BIOS setup
- Navigate to the Diagnostics tab (or similar)
- Run the diagnostic tool provided by your computer manufacturer
- Follow the on-screen instructions to diagnose and repair any issues with the hard drive or SSD
- Repair the Master Boot Record (MBR)
- Insert your Windows installation media (DVD or USB)
- Restart your computer and boot from the installation media
- Select your language preferences and click “Next”
- Click on “Repair your computer”

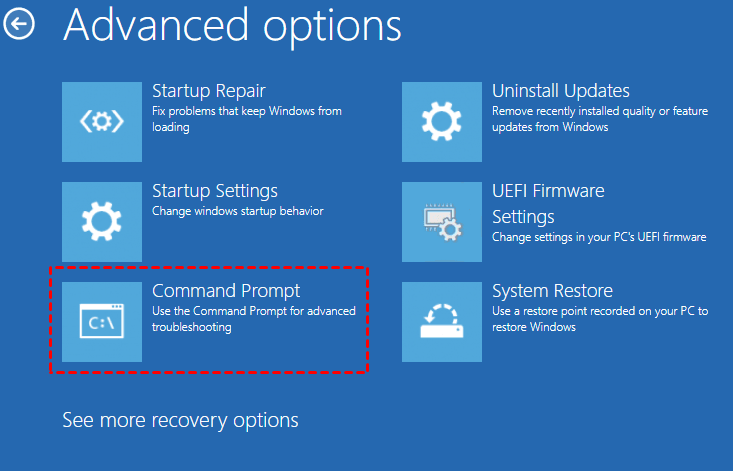
- Choose “Troubleshoot” and then “Advanced options”
- Select “Command Prompt”
- Type bootrec /fixmbr and press Enter
- Wait for the process to complete and then restart your computer
- Check for disk errors using chkdsk
- Open Command Prompt as administrator
- Type chkdsk C: /f (replace “C” with the drive letter that is displaying the non-system disk error)
- Press Enter and wait for the process to complete
- If prompted to schedule the check for the next restart, type “Y” and press Enter
- Restart your computer and allow chkdsk to scan and repair any errors on the disk
Removing Non-Bootable Storage Devices
To remove non-bootable storage devices, follow these steps:
1. Shut down your PC and disconnect all external storage devices.
2. Open your computer case and locate the non-bootable storage device.
3. Check the cables connecting the device to the motherboard. Make sure they are securely connected.
4. If the device is a hard disk drive (HDD), ensure it is properly powered and connected via SATA or IDE cable.
5. Restart your computer and enter the UEFI or BIOS settings by pressing the designated key during startup.
6. Go to the “Boot” or “Boot Priority” section and set the boot device to your primary OS drive.
7. Save the settings and exit the UEFI or BIOS.
8. If the non-bootable device is still causing issues, consider replacing it with a working one.
9. If you’re using a laptop, remove any CD or floppy disk from the optical drive before starting the device.
10. Restart your computer and check if the “Non-System Disk” error message is resolved.
These steps should fix the non-system disk error and allow your Windows 10 PC to start without any trouble.
python

import psutil
def check_disk_errors():
partitions = psutil.disk_partitions()
for partition in partitions:
try:
partition_usage = psutil.disk_usage(partition.mountpoint)
if partition_usage.total == 0:
print(f"Disk error on {partition.device}")
else:
print(f"Disk is healthy on {partition.device}")
except Exception as e:
print(f"Error checking disk: {str(e)}")
check_disk_errors()
In this code, we import the `psutil` library, which provides an interface to retrieve system information. We define a function `check_disk_errors()` that iterates over all disk partitions and uses `psutil.disk_usage()` to check the disk’s total size. If the total size is 0, it indicates a disk error, and the corresponding message is printed. Otherwise, it prints that the disk is healthy.
Please note that this code only checks the disk usage and not specific error codes or messages related to non-system disk errors. To handle more specific disk errors, you might need to explore additional Windows APIs or error handling techniques.
Checking IDE or SATA Cable Connection
To check the IDE or SATA cable connection on your Windows 10 computer and fix the non-system disk error, follow these steps:
1. Shut down your computer and unplug it from the power source.
2. Open your computer’s case and locate the IDE or SATA cables connected to your hard drive.
3. Ensure that the cables are securely connected to both the motherboard and the hard drive.
4. If any cables appear loose or damaged, replace them with new ones.
5. After replacing or ensuring the cables are properly connected, close your computer’s case and reconnect the power source.
6. Start your computer and press any key when prompted to boot from a non-system disk.
7. If you still encounter the non-system disk error or a black screen, it may indicate a different issue. Consider seeking further assistance from a professional or referring to other solutions in this article.
Setting the Correct Boot Priority in BIOS/UEFI
To fix the non-system disk error in Windows 10, ensure the correct boot priority is set in the BIOS/UEFI. Follow these steps:
1. Restart your computer and enter the BIOS/UEFI settings.
2. Look for the boot priority or boot order option.
3. Set the primary boot device to your HDD or Windows drive.
4. Save the changes and exit the BIOS/UEFI.
5. Restart your computer and check if the error is resolved.
If the issue persists, you can try other solutions mentioned in the article.
Removing and Reinstalling the Hard Drive
To remove and reinstall the hard drive, follow these steps:
1. Turn off your computer and disconnect the power source.
2. Locate the hard drive on your laptop or computer. It is usually located on the bottom or side of the device.
3. Remove any screws or fasteners holding the hard drive in place.
4. Gently lift the hard drive out of its slot or compartment.
5. To reinstall the hard drive, align it with the slot or compartment and carefully insert it.
6. Secure the hard drive with any screws or fasteners.
7. Reconnect the power source and turn on your computer.
If you still encounter the non-system disk error message, try other methods from the article to fix the issue.
Using Windows Repair Services
To fix the non-system disk error in Windows 10 and recover your data, you can use Windows Repair Services. Here are 10 solutions:
1. Start by checking if any external storage devices, like USB drives or DVDs, are connected to your computer. Disconnect them and restart the device.
2. If the error persists, try fixing the boot files using the Windows Recovery Environment. Restart your computer and press the designated key to access the boot menu. Select “Windows Recovery Environment” and follow the on-screen instructions.
3. You can also use the built-in Windows Disk Cleanup utility to remove unnecessary files that may be causing the error. Open the Start menu, search for “Disk Cleanup,” and run the tool.
4. Another option is to use the CHKDSK command to check and repair any issues with your hard drive. Press the Windows key + R, type “cmd,” and press Enter. In the Command Prompt, type “chkdsk /f” and hit Enter. Follow the instructions to complete the process.
5. If the error persists, you can try using third-party software like MiniTool Partition Wizard to repair any disk-related issues. Download and install the software, then follow its instructions to fix the non-system disk error.
6. Some laptops have a built-in recovery partition. Restart your computer and press the designated key to access the recovery options. Choose the option to repair your computer and follow the on-screen instructions.
7. If you have a Windows installation disk or USB, you can use it to repair the non-system disk error. Insert the installation media and restart your computer. Select the language and keyboard layout, then click “Repair your computer.” Choose the appropriate options to fix the error.
8. In some cases, the error may be caused by a faulty hard drive or its connection. Check the connections and replace the hard drive if necessary. Make sure to back up your data before doing this.
9. If you see a “replace and strike any key when ready” message, it means your computer is trying to boot from a non-bootable device. Remove any CDs, DVDs, or USB drives, then press any key to continue.
10. If you encounter a black screen with the error message, try disconnecting any external displays and restarting your computer. If the error persists, seek professional help.
Advanced Troubleshooting: Accessing and Recovering Data from Hard Drive
Advanced troubleshooting techniques can help users access and recover data from a hard drive when encountering a non-system disk error on Windows 10. One way to fix this issue is by replacing the faulty disk and following these steps:
1. Start the device and insert a bootable Windows installation disk or USB drive.
2. Restart the computer and press the key specified by your device to enter the boot menu.
3. Select the bootable disk or USB drive from the menu.
4. When prompted, choose the language and click “Next.”
5. Click “Repair your computer” and select “Troubleshoot.”
6. Choose “Advanced options” and select “Command Prompt.”
7. In the command prompt, type “chkdsk /f /r” and press Enter.
8. Wait for the process to complete and restart the computer.
Rebuilding MBR to Fix Non-System Disk or Disk Error
If you’re encountering a non-system disk or disk error message on your Windows 10 laptop, it could be due to a corrupt Master Boot Record (MBR). Here are 10 solutions to recover data and fix the issue:
1. Start by checking if any external disks or devices are connected to your computer.
2. Restart your computer and remove any CDs, DVDs, USBs, or floppy disk drives.
3. Ensure that your hard drive is properly connected and functioning.
4. Try booting from a Windows installation disc or USB drive.
5. Use the Command Prompt to rebuild the MBR:
bootrec /fixmbr
bootrec /fixboot
bootrec /rebuildbcd
6. Run a disk check utility to scan and repair any errors on your hard drive.
7. Update your computer’s BIOS firmware.
8. Reset your computer’s CMOS settings.
9. If none of the above methods work, you may need to replace your hard drive.
10. Remember to back up your data regularly to avoid data loss.
Possible Reasons for Disk Error in Windows 10/8/7
Possible Reasons for Disk Error in Windows 10/8/7:
1. Incorrect boot order: Ensure that the correct boot device is selected in the BIOS settings.
2. Faulty hard drive connection: Check and reseat the cables connecting the hard drive to the motherboard.
3. Corrupt boot sector: Use the Windows recovery console to fix the boot sector.
4. Damaged disk: Run a disk check utility to scan and repair any errors on the disk.
5. Malware or virus infection: Scan your computer for malware and remove any threats found.
6. Insufficient power supply: Ensure that your laptop’s battery or power adapter is functioning properly.
7. Outdated or incompatible drivers: Update your device drivers to the latest version.
8. Faulty hardware: Test your hard drive and other hardware components for any issues.
9. Corrupt operating system: Perform a clean installation of Windows to fix any system-related issues.
10. Physical damage to the disk: If all else fails, consider replacing the damaged disk.
Steps to Fix Non-System Disk Error or Disk Error in Windows 10/8/7
If you’re encountering a non-system disk error or disk error on your Windows 10/8/7 computer, follow these steps to fix the issue and recover your data.
1. Check for floppy disks or CDs: Make sure there are no disks inserted in the floppy disk drive or CD/DVD drive.
2. Restart your computer: Sometimes, a simple restart can resolve the issue.
3. Check the boot order: Ensure that your hard drive is set as the primary boot device in the BIOS settings.
4. Disconnect external devices: Unplug any external devices (USB drives, memory cards) and restart your computer.
5. Run the startup repair tool: Use the Windows startup repair tool to fix any startup issues.
6. Check hard drive connections: Ensure that the hard drive cables are securely connected to the motherboard and the drive itself.
7. Run a disk check: Use the CHKDSK command to scan and repair any disk errors.
8. Repair the Master Boot Record (MBR): Use the bootrec command to repair the MBR.
9. Reinstall Windows: If all else fails, consider reinstalling Windows to resolve the issue.
10. Contact Microsoft Support: If you’re still having trouble, reach out to Microsoft Support for further assistance.