How to Format USB to FAT32 on Windows 10/11
Unlocking the potential of your USB drive while navigating Windows 10/11 can be a daunting task. In this article, we unravel the secrets behind formatting your USB to FAT32 effortlessly, ensuring seamless compatibility and hassle-free data transfer.
Fixing the “Can’t Format to FAT32” Problem
If you’re having trouble formatting a USB drive to FAT32 on Windows 10/11, here’s a solution for you.
First, open Disk Management by searching for it in the Start menu.
Next, locate your USB drive in the list of drives. Right-click on it and select “Format.”
In the Format window, choose FAT32 as the File System.
If the FAT32 format option is not available, you can use third-party software like MiniTool Partition Wizard or EaseUS Partition Master to format the drive to FAT32.
Follow the on-screen instructions to complete the formatting process. Keep in mind that formatting will erase all data on the drive, so make sure to back up any important files beforehand.
Once the formatting is done, your USB drive should now be formatted to FAT32 and ready to use.
Solutions for Formatting USB to FAT32
- Open Disk Management by pressing Windows key + X and selecting Disk Management from the menu.
- Locate the USB drive in the list of available disks.
- Right-click on the USB drive and select Format.
- Choose FAT32 as the file system.
- Click on OK to start the formatting process.
Solution 2: Using Command Prompt
- Open Command Prompt as an administrator by pressing Windows key + X and selecting Command Prompt (Admin).
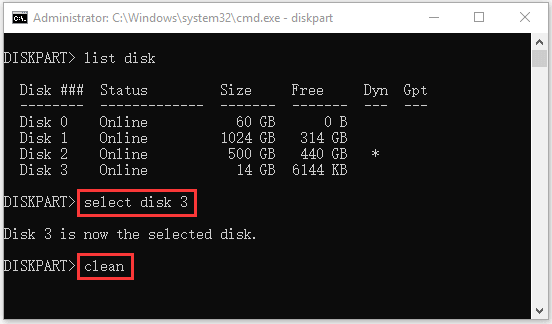
- Type diskpart and press Enter to open the DiskPart utility.
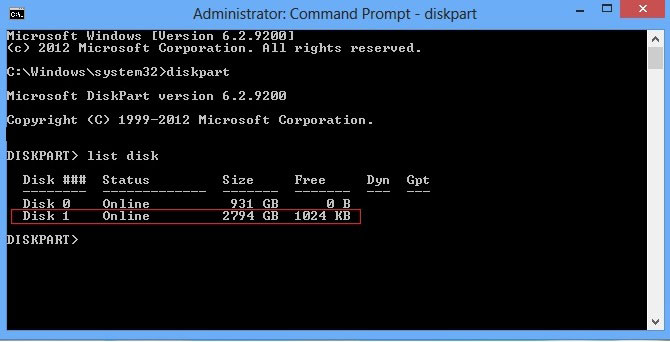
- Type list disk and press Enter to display a list of available disks.
- Identify the USB drive in the list by its size and make note of its disk number.
- Type select disk X (replace X with the disk number of the USB drive) and press Enter.
- Type clean and press Enter to remove all partitions on the USB drive.
- Type create partition primary and press Enter to create a new primary partition on the USB drive.
- Type format fs=fat32 quick and press Enter to format the USB drive with the FAT32 file system.
Solution 3: Using Third-Party Software
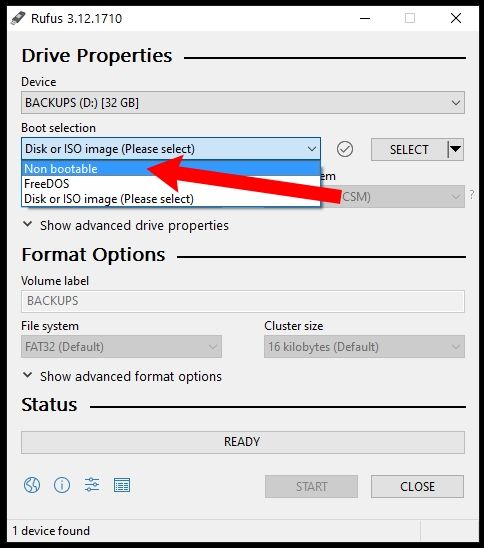
- Download and install a reliable third-party software tool for formatting USB drives, such as EaseUS Partition Master or MiniTool Partition Wizard.
- Launch the software and select the USB drive from the list of available disks.
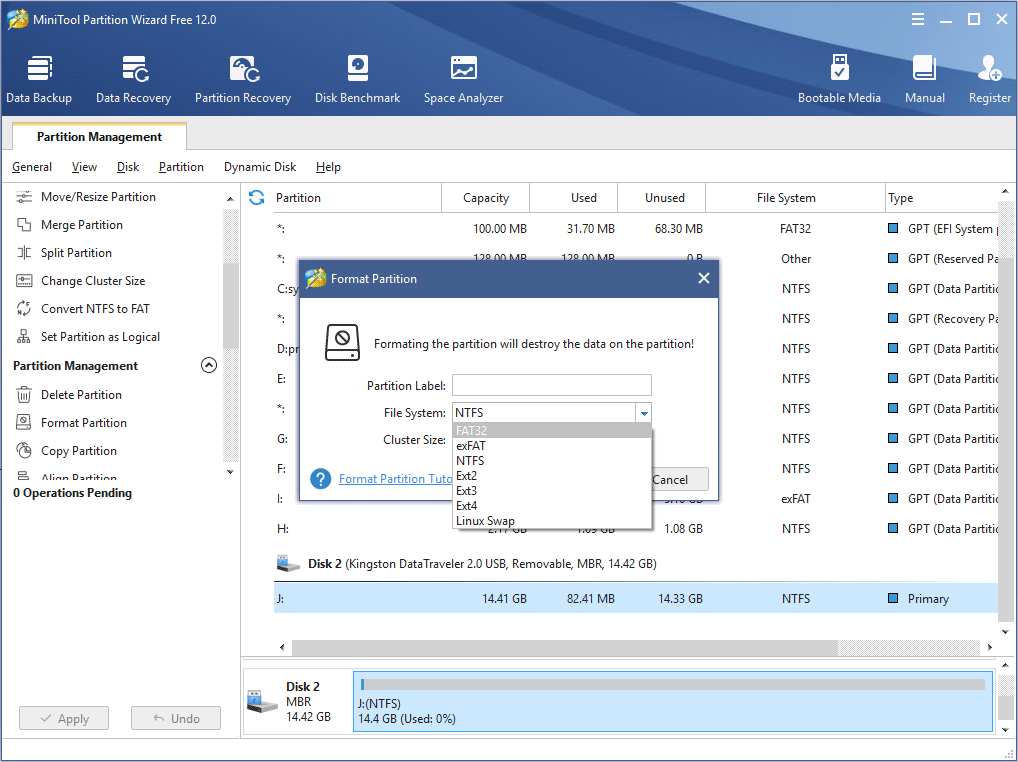
- Choose the option to format the USB drive, selecting FAT32 as the file system.
- Follow the on-screen prompts to complete the formatting process.
powershell

# Check if the system supports the "format" command

if (Test-Path "$env:SystemRoot\System32\format.com") {

    # Format the drive to FAT32 using the "format" command

    & "$env:SystemRoot\System32\format.com"  /FS:FAT32 /Q /V:

}

else {

    Write-Host "The 'format' command is not available on this system."

}
Please replace “ with the appropriate drive letter (e.g., “D:”) and “ with the desired volume label for the formatted drive. Keep in mind that this code only works if the system has the “format” command available.
It’s worth noting that Windows 10 usually supports formatting removable drives to FAT32 through the graphical user interface. However, if you’re unable to find the FAT32 option, it could be due to specific limitations or restrictions on the drive or the partition you are trying to format.
Reasons for the Unavailability of FAT32 Option
There are several reasons why the FAT32 option may not be available when formatting a USB on Windows 10/11.
1. Size Limit: FAT32 has a maximum file size limit of 4GB and a maximum partition size limit of 32GB. If your USB exceeds these limits, the FAT32 option will not be available.
2. Disk Manager: The FAT32 option may not be available in the Windows Disk Manager. In such cases, you can use third-party software like MiniTool Partition Wizard or AOMEI Partition Assistant to format your USB to FAT32.
3. File System Support: Certain devices, such as memory cards or micro SD cards, may not support the FAT32 file system. In these cases, you may need to use alternative file systems like exFAT or NTFS.
4. Operating System Compatibility: Some versions of Windows may not have native support for the FAT32 format option. It is recommended to check Microsoft’s official website or relevant forums for solutions or updates.
By understanding these reasons, you can troubleshoot any issues you may encounter when trying to format a USB to FAT32 on Windows 10/11.
Important Steps Before Formatting and Troubleshooting FAT32
Before formatting and troubleshooting FAT32, there are a few important steps you should take.
First, ensure that you have backed up any important data on the USB drive, as formatting will erase all existing files.
Next, check if your USB drive is currently formatted as FAT32. You can do this by right-clicking on the drive in File Explorer, selecting “Properties,” and navigating to the “General” tab.
If the drive is not already formatted as FAT32, you will need to format it. To do this, follow these steps:
1. Press the Windows key + R to open the Run dialog box.
2. Type “diskmgmt.msc” and press Enter to open Disk Management.
3. Locate your USB drive in the list of disks and right-click on its partition.
4. Select “Format” and choose FAT32 as the file system.
5. Follow the on-screen instructions to complete the formatting process.
Once the USB drive is formatted as FAT32, you can troubleshoot any issues you may encounter.
Understanding FAT32 and Troubleshooting Windows 11 Format Issue
table {
border-collapse: collapse;
width: 100%;
}
th, td {
text-align: left;
padding: 8px;
}
th {
background-color: #f2f2f2;
}
tr:nth-child(even){background-color: #f2f2f2}
Understanding FAT32 and Troubleshooting Windows 11 Format Issue
Article Title: How to Format USB to FAT32 on Windows 10/11
| Section | Description |
|---|---|
| 1. What is FAT32? | FAT32 is a file system commonly used for USB drives and external storage devices. It has a maximum file size limit of 4GB and a maximum partition size of 2TB. |
| 2. Benefits of using FAT32 | – Compatibility: FAT32 is supported by various operating systems including Windows, Mac, and Linux. – Portability: FAT32 formatted drives can be easily accessed on different devices. – Simple file management: FAT32 has a straightforward directory structure. |
| 3. Troubleshooting Windows 11 Format Issue | If you’re facing issues formatting a USB drive to FAT32 on Windows 11, follow these steps: 1. Check the USB drive for any write protection switch or software. 2. Use Disk Management tool to format the USB drive. 3. Update your USB drivers. 4. Try formatting the USB drive using Command Prompt. 5. Use third-party formatting tools as a last resort. |
| 4. Conclusion | Formatting a USB drive to FAT32 on Windows 10/11 is essential for compatibility and portability. If you encounter any issues, troubleshooting steps can help you overcome them. |