Reboot and Select Proper Boot Device Error Fix for New PC
Welcome to the ultimate guide on fixing the infuriating “Reboot and Select Proper Boot Device” error that often haunts new PCs. In this article, we will unravel the mysteries behind this perplexing issue and equip you with effective solutions to get your system up and running in no time. So, buckle up and let’s dive into the realm of boot devices!
Causes and Solutions for “Reboot and Select Proper Boot Device” Error
If you encounter the “Reboot and Select Proper Boot Device” error on your new PC, there are a few causes and solutions to consider.
First, ensure that your boot device is properly connected to your motherboard. Check the cables and connections to ensure everything is secure.
Next, access your BIOS settings by restarting your computer and pressing the Delete key (or another key specified by your motherboard) to enter the BIOS menu. Once in the BIOS, navigate to the boot options and make sure the correct boot device is selected as the primary option.
If the issue persists, it may be due to a problem with your boot media. Try inserting a Windows installation disk or USB drive and booting from that.
Additionally, check if your hard disk drive (HDD) or solid-state drive (SSD) is properly recognized by your BIOS. If not, try reseating the drive or replacing it if necessary.
Remember to save any changes made in the BIOS before exiting.
Understanding Boot Devices and Common Boot Device Errors
If you encounter a “Reboot and Select Proper Boot Device” error on your new PC, don’t panic. This error typically occurs when your computer fails to locate a bootable device, such as your hard disk drive (HDD) or boot media. Here are some suggestions to resolve this issue:
1. Check your boot options: Restart your computer and access the boot menu by pressing the key indicated during the post. Ensure that your desired boot device is selected as the primary option.
2. Verify hardware connections: Double-check that all components, including the HDD and boot media, are properly connected inside your desktop PC. Pay attention to the specifics of your build and make sure everything is securely in place.
3. Inspect your boot device: If you suspect a problem with your boot device, such as a faulty partition or corrupt OS, try booting from a different bootable device or reinstalling the operating system.
4. Consider the motherboard battery: In some cases, a drained or faulty motherboard battery can cause boot device errors. Check the battery’s location on your motherboard and replace it if necessary.
How to Quickly Fix the Error on Windows 10/8/7
To quickly fix the “Reboot and Select Proper Boot Device” error on Windows 10/8/7, follow these steps:
1. Start by checking the boot sequence in the BIOS settings. Restart your computer and press the Delete key (or F2, F10, or F12 depending on your motherboard) to enter the BIOS.
2. Once in the BIOS, navigate to the “Boot” or “Boot Order” section. Make sure your primary boot device (usually the hard drive) is listed first.
3. If the boot sequence is correct, ensure that all connections inside your PC are secure. Check cables and connections for any loose or disconnected components.
4. If the error persists, it could indicate a problem with your hard drive. Try reconnecting or replacing the cables connected to your hard drive.
5. If none of the above solutions work, it’s possible that your hard drive may be faulty. Consider seeking professional assistance or replacing the hard drive.
Additionally, it can fix damaged DLL files and even repair causes of the Blue Screen of Death. While not explicitly mentioned, Fortect‘s OS Recovery feature may also assist in resolving reboot and boot device selection issues.

python

import psutil
def get_boot_devices():
boot_devices = []
partitions = psutil.disk_partitions(all=True)
for partition in partitions:
if 'rw' in partition.opts and 'bootable' in partition.opts:
boot_devices.append(partition.device)
return boot_devices
# Usage
boot_devices = get_boot_devices()
print("Boot Devices:")
for device in boot_devices:
print(device)
Please note that the code above only identifies potential boot devices based on writable and bootable partitions. Modifying boot devices or rebooting the system requires lower-level access and cannot be achieved solely through code execution.
Checking BIOS Settings and Boot Order
To check BIOS settings and boot order, follow these steps:
1. Start by powering on your desktop PC and immediately press the DEL or F2 key to enter the BIOS setup.
2. In the BIOS setup, navigate to the Boot tab or section.
3. Look for the Boot Order or Boot Priority option.
4. Ensure that the boot device containing your operating system (OS) is listed first in the boot order.
5. Use the arrow keys to rearrange the boot order if needed. You may need to consult your motherboard manual for specific instructions.
6. Save the changes and exit the BIOS setup. Most often, you can press F10 to save and exit.
7. Restart your PC and check if the “Reboot and Select Proper Boot Device” error is resolved.
If you’re still encountering the boot device error, double-check the connections of your hard drives, ensure the boot disk is properly inserted, and verify that your OS is installed correctly.
Recommended Actions for Legacy BIOS Users
Recommended Actions for Legacy BIOS Users
If you are encountering the “Reboot and Select Proper Boot Device” error on your new PC with Legacy BIOS, here are some recommended actions to fix the issue:
| Action | Description |
|---|---|
| 1. Check boot order | Make sure the hard drive with the operating system is set as the first boot device in the BIOS settings. Refer to your motherboard’s manual for instructions on how to change the boot order. |
| 2. Verify hard drive connections | Ensure that the cables connecting the hard drive to the motherboard are securely plugged in. Sometimes loose connections can cause boot issues. |
| 3. Reset BIOS settings | Reset the BIOS settings to their default values. This can be done by either removing the CMOS battery for a few seconds or using the clear CMOS jumper on the motherboard. Refer to your motherboard’s manual for specific instructions. |
| 4. Update BIOS firmware | Check if there are any BIOS updates available for your motherboard model on the manufacturer’s website. Updating the BIOS to the latest version can sometimes resolve compatibility issues. |
| 5. Test the hard drive | Use a diagnostic tool, such as HDDScan or CrystalDiskInfo, to check the health and integrity of your hard drive. If any errors are detected, consider replacing the drive. |
| 6. Reinstall the operating system | If none of the above solutions work, you may need to reinstall the operating system. Ensure you have a backup of your important files before proceeding. |
Fixing Windows Boot Files and Reinstalling Windows
If you’re encountering the “Reboot and Select Proper Boot Device” error on your new PC, it may be due to issues with your Windows boot files or a need to reinstall Windows. Here are some concise steps to help you resolve this problem:
1. Insert your boot disk or Windows installation media into your PC’s optical drive or USB port.
2. Restart your PC and access the boot menu by pressing the appropriate key (check your PC’s manual or manufacturer’s website for specifics). Select the device with the boot disk or media in it.
3. When prompted, press any key to boot from the disk or media.
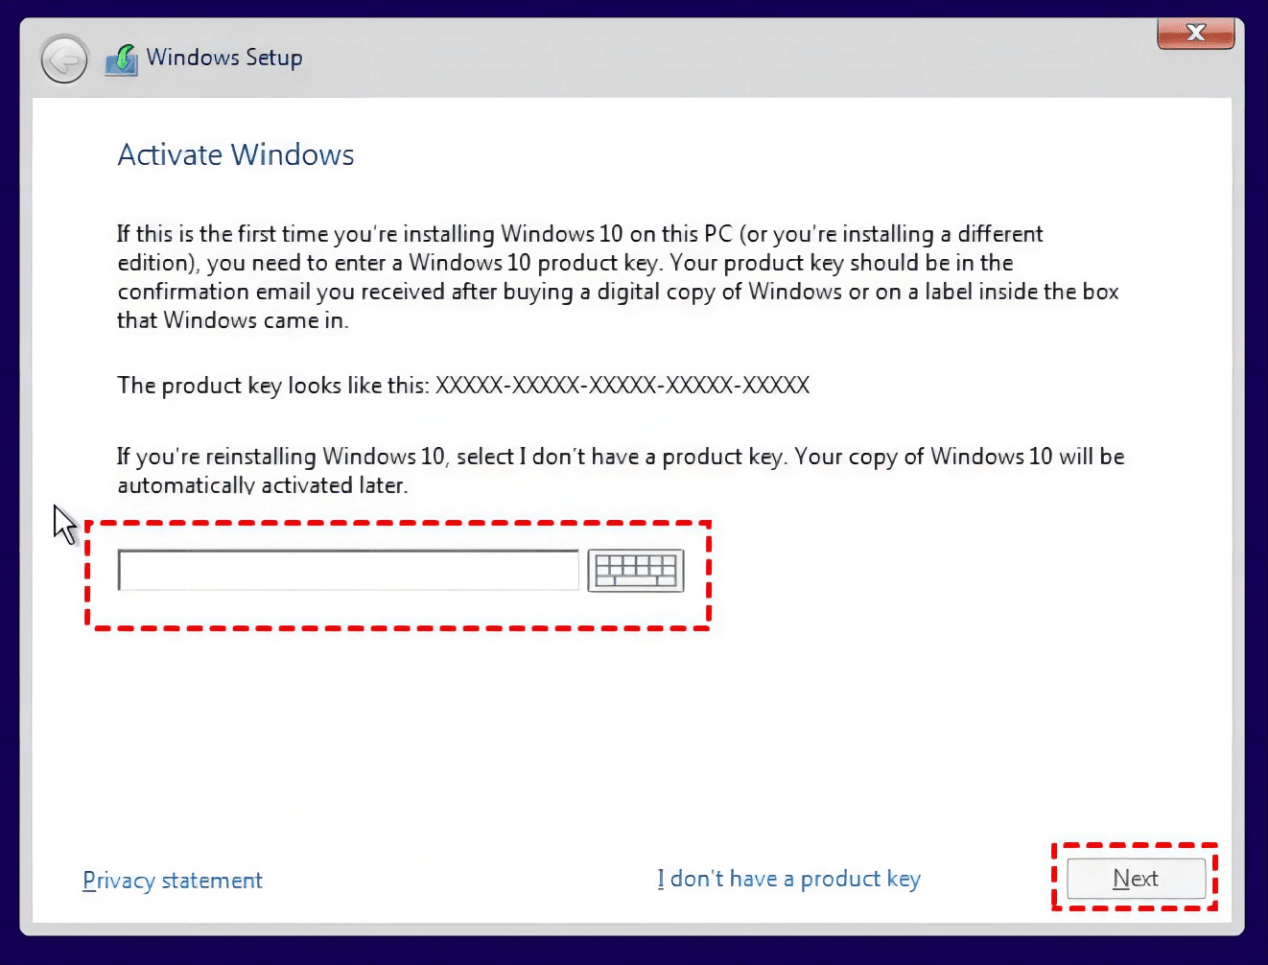
4. Follow the on-screen instructions to access the Windows Setup screen.
5. Choose your language preferences and click “Next.”
6. Click “Repair your computer” at the bottom left corner of the screen.
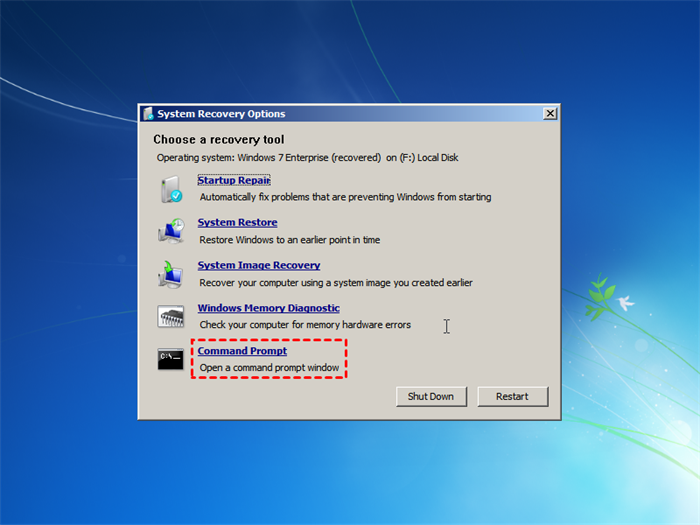
7. Select “Troubleshoot” and then “Advanced options.”
8. Choose “Command Prompt.”
9. In the Command Prompt window, type bootrec /fixboot and press Enter.
10. After the process completes, type exit and press Enter to close the Command Prompt.
11. Restart your PC and check if the error message persists.
Frequently Asked Questions about “Reboot and Select Proper Boot Device” Error
- Check Boot Order in BIOS Settings
- Restart the computer and press the designated key (such as F2 or Del) to enter BIOS settings
- Locate the “Boot” or “Boot Order” section in the BIOS menu
- Ensure that the primary boot device is set correctly (e.g., the hard drive or SSD where the operating system is installed)
- Save the changes and exit the BIOS settings
- Check Hard Drive Connections
- Power off the computer and unplug it from the power source
- Open the computer case and locate the hard drive cables
- Make sure the cables are securely connected to the hard drive and motherboard
- If necessary, reseat the cables by disconnecting and reconnecting them
- Close the computer case and reconnect the power
- Power on the computer and check if the error is resolved
- Check for Faulty Hard Drive
- Create a bootable USB drive or DVD with a diagnostic tool like MemTest86 or HDDScan
- Insert the bootable USB drive or DVD into the computer
- Restart the computer and access the boot menu (usually by pressing a designated key like F12)
- Select the bootable USB drive or DVD from the menu
- Follow the instructions provided by the diagnostic tool to test the hard drive for errors
- If any errors are detected, consider replacing the faulty hard drive
- Repair Windows Bootloader
- Insert the Windows installation media (USB or DVD) into the computer
- Restart the computer and access the boot menu
- Select the Windows installation media from the menu
- Choose the language and other preferences, then click “Next”
- Click on “Repair your computer”
- Select the operating system to repair (if prompted)
- Choose the option to repair the bootloader or startup problems
- Follow the on-screen instructions to complete the repair process
Make sure to carefully reboot and select the proper boot device on your new PC to avoid any potential system errors or data loss. Download this tool to run a scan